Getting started in NLP
このノートでは、kaggleのNLP(自然言語処理)を行う方法を紹介します。tweetデータから、そのtweetが災害についての発信であるかを分類します。深層学習にはfastaiライブラリーを使用します。目標は80% f1 scoreでtweetを分類するモデルをつくることです。80%はAutoMLのスコアを基にしたものです。
–
実装の流れは以下の通りです。
必要なライブラリのインストール
分類モデル用データセットを用意
分類モデルの作成
kaggleに提出
まとめ
参照リンク
0. 必要なライブラリのインストール
競技参加の同意・APIキーの取得を、テータセットのインストール前に行っていきましょう。
try : import fastkaggleexcept ModuleNotFoundError :% pip install - Uq fastkagglefrom fastkaggle import * from fastai.text.all import *
WARNING: Running pip as the 'root' user can result in broken permissions and conflicting behaviour with the system package manager. It is recommended to use a virtual environment instead: https://pip.pypa.io/warnings/venv
Note: you may need to restart the kernel to use updated packages.
! mkdir / root/ .config/ kaggle! touch / root/ .config/ kaggle/ kaggle.json
1. 分類モデル用データセットを用意
tweetデータはcsvファイルで取得されます。各データセットのサンプル数は、トレーニングが7613、テストが3263です。一つの列に対して、1tweet・対応するラベル(1が災害、0が災害以外のtweet)が含まれています。
= "nlp-getting-started" = setup_comp(comp)
Warning: Your Kaggle API key is readable by other users on this system! To fix this, you can run 'chmod 600 /root/.config/kaggle/kaggle.json'
(#3) [Path('nlp-getting-started/sample_submission.csv'),Path('nlp-getting-started/test.csv'),Path('nlp-getting-started/train.csv')]
= pd.read_csv(path/ "train.csv" )= pd.read_csv(path/ "test.csv" )= pd.read_csv(path/ "sample_submission.csv" )
((7613, 5), (3263, 4), (3263, 2))
0
1
NaN
NaN
Our Deeds are the Reason of this #earthquake May ALLAH Forgive us all
1
1
4
NaN
NaN
Forest fire near La Ronge Sask. Canada
1
2
5
NaN
NaN
All residents asked to 'shelter in place' are being notified by officers. No other evacuation or shelter in place orders are expected
1
3
6
NaN
NaN
13,000 people receive #wildfires evacuation orders in California
1
4
7
NaN
NaN
Just got sent this photo from Ruby #Alaska as smoke from #wildfires pours into a school
1
トレーニングデータにはいくつかの重複データが含まれていますが、特にtextデータの重複には注意が必要です。学習・検証データを作成する際に、同一データが二つのデータセットにまたがって含まれないようにします。例えば、11-Year-Old Boy Charged...の文章が検証データに含まれている場合、学習データはそのtweetデータを含まないことになります。広く使用されているランダムな学習セットの用意は、このデータには不適切であることが分かります。
= "object" )
count
7552
5080
7613
unique
221
3341
7503
top
fatalities
USA
11-Year-Old Boy Charged With Manslaughter of Toddler: Report: An 11-year-old boy has been charged with manslaughter over the fatal sh...
freq
45
104
10
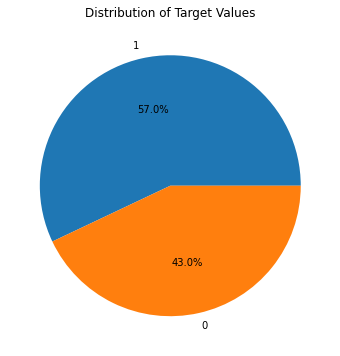
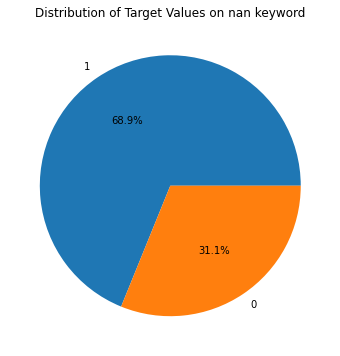
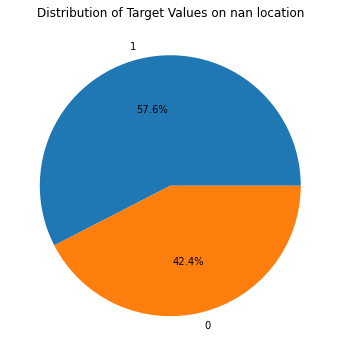
ここでは、以下の学習データセットに対してtargetの割合がどう変化するかを示します。面白い点は、keywordデータの欠如が災害tweetの割合を増やしている点です。一方locationデータの有無は、災害tweetの割合に影響を与えていません。これが何を示すのかは分かりませんが、keywordを含ませると何らかの情報(災害に関する)をモデルに渡すことが推測できます。
def plot_target(df, title= "" ):= (8 , 6 ))"target" ].value_counts(), labels= df["target" ].unique(), autopct= ' %1.1f%% ' )"Distribution of Target Values" )
"Distribution of Target Values on nan keyword" )
"Distribution of Target Values on nan location" )
以下の関数random_splitterは、学習・検証セット間の同一データの重複(data leakage)を防ぎます。
def random_splitter(df, val_pct= 0.2 ):= df.copy()"uniq_text" ] = df["text" ].map (lambda x: hash (x))= df["uniq_text" ].unique()= set (random.sample(list (uniq_text), int (len (uniq_text) * val_pct)))= df.index[~ df["uniq_text" ].isin(val_text_ids)].tolist()= df.index[df["uniq_text" ].isin(val_text_ids)].tolist()return trn_idx, val_idx# Check no duplicates across train/valid set = random_splitter(trn_df)print (len (trn_idx), len (val_idx))set (trn_df.iloc[trn_idx]["text" ]).intersection(set ((trn_df.iloc[val_idx]["text" ])))
テストデータをざっくりと見ると、トレーニングデータと似通ったtweetデータが含まれていることが分かります。
0
0
NaN
NaN
Just happened a terrible car crash
1
2
NaN
NaN
Heard about #earthquake is different cities, stay safe everyone.
2
3
NaN
NaN
there is a forest fire at spot pond, geese are fleeing across the street, I cannot save them all
3
9
NaN
NaN
Apocalypse lighting. #Spokane #wildfires
4
11
NaN
NaN
Typhoon Soudelor kills 28 in China and Taiwan
= "object" )
count
3237
2158
3263
unique
221
1602
3243
top
deluged
New York
11-Year-Old Boy Charged With Manslaughter of Toddler: Report: An 11-year-old boy has been charged with manslaughter over the fatal sh...
freq
23
38
3
次のcombine_cols関数は、keyword・location・textデータを繫げます。各行の合間に挟まれるxxfldはテキストを繋げる際に使用される、fastaiのデフォルトのトークン(参照リンク )です。
# Ref: https://github.com/fastai/fastai/blob/master/fastai/text/core.py#L199 def combine_cols(df): return "xxfld 1 " + df["keyword" ].fillna("" ) + " xxfld 2 " + df["location" ].fillna("" ) + " xxfld 3 " + df["text" ]"text" ] = combine_cols(trn_df)"text" ] = combine_cols(tst_df)"text" ].head(), tst_df["text" ].head()
(0                                                                    xxfld 1  xxfld 2  xxfld 3 Our Deeds are the Reason of this #earthquake May ALLAH Forgive us all
 1                                                                                                   xxfld 1  xxfld 2  xxfld 3 Forest fire near La Ronge Sask. Canada
 2    xxfld 1  xxfld 2  xxfld 3 All residents asked to 'shelter in place' are being notified by officers. No other evacuation or shelter in place orders are expected
 3                                                                        xxfld 1  xxfld 2  xxfld 3 13,000 people receive #wildfires evacuation orders in California
 4                                                 xxfld 1  xxfld 2  xxfld 3 Just got sent this photo from Ruby #Alaska as smoke from #wildfires pours into a school
 Name: text, dtype: object,
 0                                                                  xxfld 1  xxfld 2  xxfld 3 Just happened a terrible car crash
 1                                    xxfld 1  xxfld 2  xxfld 3 Heard about #earthquake is different cities, stay safe everyone.
 2    xxfld 1  xxfld 2  xxfld 3 there is a forest fire at spot pond, geese are fleeing across the street, I cannot save them all
 3                                                            xxfld 1  xxfld 2  xxfld 3 Apocalypse lighting. #Spokane #wildfires
 4                                                       xxfld 1  xxfld 2  xxfld 3 Typhoon Soudelor kills 28 in China and Taiwan
 Name: text, dtype: object)
分類学習モデル用のデータを用意し表示します。
def get_dls(df, seq_len= 72 , vocab= None , backwards= False , splitter= random_splitter, bs= 256 ):return DataBlock(= (TextBlock.from_df("text" , seq_len= seq_len, vocab= vocab, backwards= backwards), CategoryBlock),= ColReader("text" ),= ColReader("target" ),= splitter= bs)= get_dls(trn_df)= 5 )
0
xxbos xxfld 1 army xxfld 2 xxmaj pakistan xxfld 3 . : . : . : . : . : . : . : . : . : . : . : . : . : . : . : . : . : . : . : . : . : xxup rt xxunk : # xxunk \n\n xxmaj indian xxmaj army xxunk _ http : / / t.co / xxunk g
0
1
xxbos xxfld 1 curfew xxfld 2 xxmaj adelaide , xxmaj australia xxfld 3 xxup info xxup r. xxup curfew xxup in xxup oper xxup until 2030 xxup z. xxup taxiways xxup foxtrot 5 & & xxup foxtrot 6 xxup navbl . xxup wnd : xxunk / 5 . xxup exp xxup inst xxup apch . xxup rwy 05 . xxup xxunk . xxup tmp : 10 . xxup xxunk : xxunk .
0
2
xxbos xxfld 1 curfew xxfld 2 xxmaj adelaide , xxmaj australia xxfld 3 xxup info xxup s. xxup wnd : xxunk / 6 . xxup xxunk : xxup xxunk xxup xxunk . xxup exp xxup inst xxup apch . xxup rwy 05 . xxup curfew xxup in xxup oper xxup until 2030 xxup z. xxup taxiways xxup foxtrot 5 & & xxup foxtrot 6 xxup navbl . xxup tmp : 10 .
0
3
xxbos xxfld 1 death xxfld 2 xxup xxunk ? ? xxfld 3 i xxmaj hate xxmaj to xxmaj talking xxmaj xxunk xxmaj with xxmaj my xxmaj xxunk … i xxmaj mean i xxmaj love xxmaj her xxmaj as xxmaj to xxmaj death xxmaj but xxmaj she xxmaj talk xxmaj so xxmaj damn xxmaj much xxmaj xxunk xxrep 3 h xxrep 3 e xxunk xxrep 3 ! xxrep 6 ?
0
4
xxbos xxfld 1 hostages xxfld 2 xxfld 3 xxmaj no # news of # hostages in # xxmaj libya \n\n http : / / t.co / xxunk \n\n▁ # xxmaj india # terrorism # xxmaj africa # xxup ap # xxup ts # xxup nri # xxmaj news # xxup trs # xxup tdp # xxup bjp http : / / t.co / xxunk
1
2. 分類モデルの作成
データセットの用意ができたら、分類モデルの作成を行います。モデルにはAWD_LSTM を使用します。少ないトレーニングデータ(約7000サンプル数)のため、モデルは直ぐに過学習に達します。
では、過学習はどのように対処していくのか?ということを考えてみます。よくある間違いはモデルの複雑性を減らし、パラメーター数の少ないモデルに変えることです。これは最後に行うステップです。まずは、過学習にはより多くのデータを使用することを第一 に考えます。単純な例として、ここではテキストを逆方法に、最後の文字→最初の文字へと学習させてみましょう(厳密に言うとデータ拡張になりますが、あまり気にしないでください)。
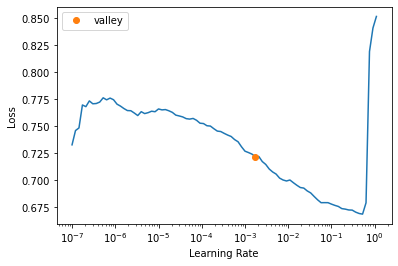
def get_classifier(dls, backwards= False ): return text_classifier_learner(dls, AWD_LSTM, backwards= backwards, drop_mult= 0.5 , metrics= [Perplexity, F1Score()]).to_fp16()= get_classifier(dls)
100.00% [105070592/105067061 00:01<00:00]
SuggestedLRs(valley=0.001737800776027143)
6 , 5e-3 , wd= 0.03 )
0
0.658422
0.599893
1.821924
0.639466
00:05
0
0.588272
0.534196
1.706076
0.669864
00:08
1
0.563553
0.489243
1.631081
0.687669
00:09
2
0.535022
0.486653
1.626862
0.716150
00:09
3
0.507074
0.464368
1.591009
0.725888
00:08
4
0.482312
0.454961
1.576113
0.728656
00:09
5
0.461974
0.456902
1.579175
0.738664
00:08
= 4 )
0
xxbos xxfld 1 mayhem xxfld 2 ? ? xxmaj made in the xxmaj philippines ? ? xxfld 3 _ \n▁ xxrep 5 ? xxup retweet \n▁ xxrep 7 ? \n▁ xxrep 5 ? xxup follow xxup all xxup who xxup rt \n▁ xxrep 7 ? \n▁ xxrep 5 ? xxup xxunk \n▁ xxrep 7 ? \n▁ xxrep 5 ? xxup gain xxup with \n▁ xxrep 7 ? \n▁ xxrep 5 ? xxup follow ? xxunk # xxup xxunk \n▁ # xxup ty
0
0
1
xxbos xxfld 1 curfew xxfld 2 xxmaj adelaide , xxmaj australia xxfld 3 xxup info xxup u. xxup xxunk : xxup xxunk xxup xxunk . xxup exp xxup inst xxup apch . xxup rwy 05 . xxup curfew xxup in xxup oper xxup until 2030 xxup z. xxup taxiways xxup foxtrot 5 & & xxup foxtrot 6 xxup navbl . xxup tmp : 10 . xxup wnd : xxunk / 6 .
0
0
2
xxbos xxfld 1 weapon xxfld 2 xxmaj washington xxup dc xxfld 3 xxmaj rare xxunk into # terror and xxmaj how to fight it http : / / t.co / xxunk # xxmaj cameroon # xxup usa # xxmaj xxunk # xxup xxunk # xxup fr # xxmaj nigeria # xxup uk # xxmaj africa # xxup de # xxup ca # xxup au # xxup xxunk
1
1
3
xxbos xxfld 1 casualties xxfld 2 xxmaj the low - xxunk xxmaj xxunk xxmaj zone xxfld 3 xxup i 'm xxup laughing xxup in xxup the xxup face xxup of xxup casualties xxup and xxup xxunk xxup the xxup first xxup time xxup i 'm xxup thinking xxup past xxup tomorrow xxup but i xxup am xxup not xxup xxunk xxup away xxup my xxup shot
1
0
逆さ文章を表示した後、モデルを学習します。先の(順方向)モデルと比較しても、今回の(逆方向)モデルも妥当なスコアを出すことが分かります。ここでの注意ポイントは、データと合わせてモデルにもbackwards=Trueを渡す ことです。逆方向に合わせた学習済み重みが、backwardsを設定することで、転移学習に使用されます。詳細はこちらのコード の確認を。
= True ).show_batch(max_n= 2 )
0
ty xxup # \n▁ xxunk xxup # xxunk ? follow xxup ? 5 xxrep \n▁ ? 7 xxrep \n▁ with xxup gain xxup ? 5 xxrep \n▁ ? 7 xxrep \n▁ xxunk xxup ? 5 xxrep \n▁ ? 7 xxrep \n▁ rt xxup who xxup all xxup follow xxup ? 5 xxrep \n▁ ? 7 xxrep \n▁ retweet xxup ? 5 xxrep \n▁ _ 3 xxfld ? ? philippines xxmaj the in made xxmaj ? ? 2 xxfld mayhem 1 xxfld xxbos
0
1
. 6 / xxunk : wnd xxup . 10 : tmp xxup . navbl xxup 6 foxtrot xxup & & 5 foxtrot xxup taxiways xxup z. xxup 2030 until xxup oper xxup in xxup curfew xxup . 05 rwy xxup . apch xxup inst xxup exp xxup . xxunk xxup xxunk xxup : xxunk xxup u. xxup info xxup 3 xxfld australia xxmaj , adelaide xxmaj 2 xxfld curfew 1 xxfld xxbos
0
= get_classifier(get_dls(trn_df, backwards= True ), backwards= True )6 , 5e-3 , wd= 0.03 )
100.00% [105209856/105205312 00:01<00:00]
0
0.612321
0.539246
1.714714
0.700943
00:05
0
0.543969
0.488203
1.629385
0.699911
00:08
1
0.522194
0.463604
1.589794
0.740679
00:08
2
0.499041
0.445374
1.561074
0.750000
00:08
3
0.477004
0.440480
1.553453
0.751048
00:08
4
0.455625
0.441258
1.554661
0.763072
00:09
5
0.436592
0.443257
1.557772
0.763309
00:09
3. kaggleに提出
では、kaggleに提出用のファイルを作成します。4つのモデル(2順方向・2逆方向)を組み合わせて、最終スコアの精度を上げます。
= []for i in range (4 ):= (i% 2 == 1 )= get_classifier(get_dls(trn_df, backwards= backwards), backwards= backwards)8 , 5e-3 , wd= 0.03 )= learn.get_preds(dl= learn.dls.test_dl(tst_df))[0 ]
0
0.677151
0.617163
1.853663
0.687425
00:05
0
0.590248
0.495130
1.640712
0.711262
00:08
1
0.571887
0.506855
1.660062
0.724490
00:09
2
0.544579
0.436301
1.546974
0.751494
00:09
3
0.515391
0.433388
1.542475
0.780450
00:09
4
0.491986
0.433089
1.542014
0.789033
00:09
5
0.470065
0.429307
1.536193
0.789147
00:08
6
0.448351
0.434152
1.543654
0.787510
00:09
7
0.431437
0.424780
1.529254
0.790008
00:09
0
0.617464
0.540031
1.716060
0.726718
00:05
0
0.537951
0.481259
1.618110
0.735294
00:09
1
0.524030
0.496447
1.642873
0.757093
00:08
2
0.505570
0.458025
1.580948
0.772795
00:08
3
0.482626
0.456221
1.578099
0.768526
00:09
4
0.459708
0.446411
1.562694
0.766458
00:09
5
0.437200
0.456399
1.578380
0.783704
00:09
6
0.414401
0.454099
1.574754
0.779789
00:09
7
0.401246
0.452466
1.572185
0.781155
00:08
0
0.657558
0.589393
1.802894
0.703857
00:05
0
0.603144
0.505390
1.657633
0.718028
00:09
1
0.579316
0.457990
1.580893
0.722569
00:09
2
0.551933
0.453589
1.573950
0.752672
00:09
3
0.523351
0.459823
1.583794
0.761835
00:09
4
0.494781
0.451828
1.571181
0.774340
00:09
5
0.470976
0.442031
1.555864
0.778774
00:09
6
0.449637
0.433513
1.542667
0.777948
00:09
7
0.433776
0.442702
1.556909
0.777022
00:09
0
0.614581
0.544251
1.723318
0.724109
00:05
0
0.539059
0.456626
1.578739
0.762353
00:09
1
0.518621
0.436470
1.547236
0.775324
00:09
2
0.500680
0.427625
1.533611
0.783975
00:08
3
0.480591
0.423821
1.527788
0.796325
00:09
4
0.458144
0.416781
1.517070
0.779984
00:09
5
0.437416
0.421846
1.524774
0.796636
00:09
6
0.418690
0.423488
1.527280
0.793529
00:08
7
0.405416
0.421054
1.523567
0.795966
00:08
"target" ] = torch.max (sum (preds), dim=- 1 ).indices/ "submission.csv" , index= False )! head {path}/ submission.csv
id,target
0,1
2,1
3,1
9,1
11,1
12,1
21,0
22,0
27,0
from kaggle import api/ "submission.csv" , "finetuned model" , comp)
100%|██████████| 22.2k/22.2k [00:00<00:00, 71.2kB/s]
Successfully submitted to Natural Language Processing with Disaster Tweets
最後に先にインストールしたデータを削除します。
! rm - rf {path}! rm nlp- getting- started.zip
4 まとめ
目標値80% f1 scoreを達成することができました。次のブログでは、Jeremy Howardさんの論文から、ulmfit で使用された転移学習のやり方を見ていきます。
もしも読者がこのノートを役に立ったと思ったら、リアクションボタンを押してもらえると幸いです。質問や間違いがあれば、以下コメント欄に書き込んでください。